Monday, January 15, 2024

Wild Rice and Caramelized Roasted Veggie Salad w/Sriracha Maple Vinagrette

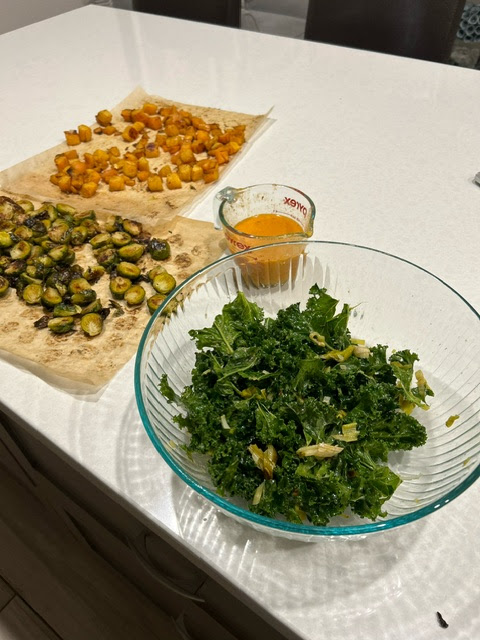
I wanted to make something that screamed winter yumminess, but could be served cold for a post hike tailgate. I've been obsessed with caramelized roasted vegetables as of late. There was no doubt they needed to be a HUGE part of the plan. Those beautiful vegetables paired with earthy wild rice and a balance of spicy and sweet vinaigrette and chopped pecans definitely hit the winter salad mark. It was the perfect way to replenish our bodies after enjoying a gorgeous winter desert hike!


Each of the components can be made ahead of time and tossed together at your convenience. Honestly, the caramelized veggies are amazing on their own. I kept eating them as I was assembling the salad. Same with the dressing. It would be a delicious addition to other salads and dishes.
But when you put it all together, it is a beautiful symphony of deliciousness!


Wild Rice and Caramelized Roasted Veggie Salad 

8 servings

1 cup wild rice, rinsed and drained
2 cups vegetable broth
2 lbs diced butternut squash (about 2 1/2 cups)
3 cups brussel sprouts, halved. For larger sprouts quartered.
6 tablespoons vegan butter, separated
2 tablespoons brown sugar, separated
1 teaspoon salt, separated
Black pepper to taste
1 large leek, white and lighter green portions, cut in half length wise and then again width wise
1 head garlic*
1 recipe Smoky Sriracha-Maple Vinaigrette (recipe below)
1 bunch kale, deveined and torn into bite sized pieces
1/2 cup chopped pecans

*head of garlic can be roasted separately if you decide to make the vinaigrette ahead of time. 

Preheat oven to 450

Line two large baking sheets with parchment paper. 

Add butternut squash to large bowl. Melt 3 tablespoons butter in small saucepan or sauté pan. Stir in 1 tablespoon brown sugar until mostly dissolved. Toss butter mixture and 1/2 teaspoon salt and black pepper  in bowl with butternut squash until squash is evenly coated. Spread squash in single layer on prepared baking sheet. 

Remove the papery outer layers of the had of garlic Slice about 1/4 inch off of the top of the garlic head to slightly expose the cloves. Brush cut leeks and head of garlic with olive oil and place on baking sheet with squash. 

Add sliced Brussel sprouts to large bowl (you can use the same bowl used for the squash and save yourself another dish to wash). Melt 3 tablespoons butter in small saucepan or sauté pan. Stir in 1 tablespoon brown sugar until mostly dissolved. Toss butter mixture and 1/2 teaspoon salt and black pepper  in bowl Brussel sprouts until is evenly coated. Spread Brussels in single layer on prepared baking sheet cut side down. 

Place both baking sheets in preheated oven and bake for 20 minutes. Remove from oven and turn squash, Brussels and leaks. Bake for 15-20 more minutes checking at 15 minutes to make sure Brussels are not burning. Also check leeks and head of garlic for doneness. If they are done, transfer leeks and garlic to pan with Brussels and remove from the oven. The butternut squash tends to take longer to roast. You will know the squash is done when it is a beautiful golden caramel color. That's the time to pull them out of the oven. Let all of the vegetables cool to room temperature. Reserve the head of roasted garlic for the dressing. 

While the vegetables are baking, add the wild rice and broth to a medium sized saucepan with a tight fitting lid. Bring to a boil and reduce to a low simmer. Simmer for 45-50 minutes until most of the liquid is absorbed and the rice grains have popped open - the rice will be a bit chewy - kind of al dente. Let sit with lid on for 10 minutes, the fluff with a fork. Let cool to room temperature. I like to put the rice in a larger bowl to encourage quicker cooling. 

Once the vegetables have cooled, thinly slice the roasted leeks and add to the large bowl from the roasted vegetable tossing. Add the kale to the bowl along with 1/2 cup of the vinaigrette. Massage the kale leek mixture to break down the kale fibers. Toss in the cooled roasted vegetable, cooled wild rice and chopped pecans until evenly coated with the vinaigrette. Add more vinaigrette to taste. Can be served immediately, but is even better after sitting in the fridge overnight. 

Smoky Sriracha Maple Vinaigrette

Makes about 1 cup

1/2 head of roasted garlic cloves*
1 teaspoon granulated onion
2 tablespoons sriracha
2 tablespoons maple syrup
2 tablespoon rice vinegar
1 tablespoon dijon mustard
1/8 teaspoon liquid smoke
1/3 cup olive oil

*If you are plan to make the dressing ahead of time the garlic can be roasted separately from the roasted vegetables above. 

For the roasted garlic:

Preheat oven to 425. Remove papery outer layers of garlic. Slice 1/4 inch of the top of the garlic head to expose the cloves. Brush the entire outside of the garlic head with olive oil. Place garlic either on a baking dish or wrap in aluminum foil. Bake for about 30-35 minutes until garlic is soft. Let cool to room temperature. The soft cloves should now be easy to remove from the skin.

For the dressing:

For what it is worth, I prefer method 2 for that beautiful silky texture

Method 1
Add all ingredients to magic bullet or other small blender and blend until emulsified.

Method 2
Add all ingredients except olive oil to a 1 cup measuring cup. Blend using an immersion blender. Slower drizzle in olive oil in while the immersion blender is running. This will result in a beautiful emulsion. 

Can be served immediately or refrigerate in an airtight container. It is even better after a day or two in the fridge. Will keep up to 1 week. 


Sunday, August 16, 2020

Teriyaki Broccoli, Cashew and "Chicken" Salad


As the record breaking heat wave continues, I find I need to have something cold and easy to grab or I might just skip eating altogether. This was not super quick to put together because your making the sauce from scratch, but it is worth it to make the home made teriyaki sauce. I feel it gives me control over the amount of sugar in it. I do recommend making the sauce ahead of time. It will keep in the fridge for a week or two. This is pretty darn healthy and had plenty of protein to boot! Enjoy!!

Teriyaki Broccoli, Cashew and "Chicken" Salad

2 large entree or 4 side servings

4 oz. Soy Curls, rehydrated in vegetable broth, drained*
1 tablespoon avocado or other neutral oil, more if needed
2 heads broccoli, cut into florets (approx 5 cups)
1/2 cup raw cashews
2 green onions (both green and white parts), thickly sliced
2 tablespoons sesame seeds (toast if you like)
1/2 cup teriyaki sauce (recipe below)

In a large skillet heat the oil over medium heat. Add soy curls and sauce until browned. Let cool In a separate steamer pan, steam broccoli florets until al dente (approx 3-4 minutes). Transfer to a bowl of ice water to stop cooking. Drain in colander or strainer until all water is drained. In a large bowl, mix all ingredients. Taste and add more teriyaki if needed to taste. Let chill 4 hours or overnight.

*Can substitute 2 cups cubed seitan

Teriyaki Sauce

Makes approx 7/8 cup

1/2 cup low sodium tamari or soy sauce
1/4 packed brown sugar
2 teaspoons fresh ginger, grated
2 cloves garlic, grated
2 teaspoons toasted sesame oil
2 tablespoons Mirin
1/4 cup cool water
1 tablespoon non-gmo corn starch

Whisk corn starch into cool water with fork until well combined. Place all ingredients in saucepan over medium heat. Whisking frequently, simmer until thickened, about 4-5 minutes. Remove from heat and let cool. Place in glass non-creative jar. Refrigerate. Will keep for up to two weeks in the refrigerator. 

Sunday, June 30, 2019

Southwestern Tempeh Rice Salad

Once upon a time...2010 to be exact, I started creating recipes for what I had hoped would be my very first vegan cookbook of the southwestern variety. I had a group of amazing testers (to whom I owe a big apology and hopefully someday a free cookbook) and was moving right along on creating some spicy, fun and flavorful dishes (almost 100 recipes!). Unfortunately I got distracted, busy, unmotivated, WHO REALLY KNOWS. Bottom line is I am very sad I did not finish the book. Someday it could become a reality. I'm truly hoping it will. In the mean time, there are some noteworthy recipes that have been collecting virtual dust for years. I thought I would give you a little sneak peak. 

It's hotter than hades here again...HELLO SUMMER! So I often get very unmotivated during the week to go anywhere near heat sources. I'm always looking for make-ahead cold dishes for the week days. This one fits the bill. 

I love this recipe for good reason. It is freaking delicious. But more than that, the black beans and tempeh provide lots of protein. The combination of peppers has the spice hitting all over your tastebuds. The rice fills you upon with healthy dose of fiber. 

Warning: this recipe while pretty easy to make, does take some time. To save time you can cook the rice a couple of days ahead of time. You can buy pre-roasted peppers as well. You can buy ranch, but the home made version is really easy and really good! But I get time crunches, so again, feel free to sub away as you need.


Southwestern Tempeh Rice Salad

This makes a good amount so it is great for a potluck or large gathering.

Makes 8 servings

1 cups brown long grain rice (measured before cooking)
2 cups water
1/8 teaspoon salt

1 fresh jalepeno roasted and peeled
1 fresh anaheim chili roasted and peeled
1 red bell pepper roasted and peeled

1-8 oz pkg tempeh
1 t canola oil
1/8 t coriander
1/4 t cumin
1/4 t hot chili powder
salt and pepper to taste

1/2 C Vegan Ranch (I used homemade) or Chipotle Ranch (see recipe below)
1 chipotle in adobo sauce (optional, depending on how hot you like it)

1 can black beans, rinsed and drained
1/2 bunch cilantoro chopped
3 green onions sliced thin (both white and green parts)
2-3 cloves garlic minced
1/2 t ground cumin
1/2 t hot chili powder
1/4 t ground coriander
3/4 t salt
black peper to taste
1 pint cherry tomatoes halved

Prepare your rice (this can be done ahead of time). In a medium saucepan bring rice water and salt to a boil. Reduce heat to low and let simmer for 35-40 minutes until water is absorbed. Turn off heat. Let sit for 10 minutes. Fluff rice with a fork and let cool completely.

Now would be a good time to roast those peppers. When they cool, peel and dice them.

Blend the ranch and chipotles until smooth. (eliminate this step if you are using Chipotle Ranch)

To prepare your tempeh:

Dice tempeh into 1 inch cubes. Boil or steam tempeh for 15 minutes. Drain. After draining, in a 10 inch sauté pan, saute the tempeh and spices in oil for about 10 minutes or until golden. Let cool.

In the mean time get yourself a very large bowl. Crumble tempeh into bowl. Mix together remaining ingredients except for the cherry tomatoes until well mixed. Gently mix in cherry tomatoes. Salt and pepper further to taste if needed.

This is best if it sits overnight. It lends itself very well to variations. Like a little less heat? Sub more roasted red peppers. Don't like tomatoes? Forget about 'em. Like it with more fire? Add more jalapeños or chipotles. 


Please leave me a comment if you decide to make it. Love to get some feedback!

Chipotle Ranch

Makes about 1 cup

1/2 cup  plus 2 tablespoons vegan mayonaise (I like Veganaise brand)
1/2 cup unsweetened soy milk
1 teaspoon apple cider vinegar
1/2 teaspoon dried parsley
1/2 teaspoon black pepper
1/2 teaspoon salt
1/2 teaspoon granulated garlic or garlic powder
1/2 teaspoon granulated onion or onion powder
1/8 teaspoon dried thyme
1/4 teaspoon smoked paprika (sweet or hot will work)
2 chipotle chiles (canned in adobo sauce), leave seeds intact

Blend all ingredients in blender of food processor. Let chill for at least 4 hours before using. Can store refrigerated for up to  2 weeks.

Saturday, January 12, 2019

Tofu, Broccoli and Sweet Potato Yellow Curry

My sister and I decided that we would embark on one month of clean eating this month. No sugar, no alcohol, minimally processed, no dairy, no white flour, no white rice and no bread or pasta. To be clear, this is NOT a New Year's resolution as I personally find those to be silly fodder and a great way to set people up for failure. What motivated us was not the start of a new year, but a desire to improve our energy levels and reduce the environmental stress on our bodies.

My sister will be the first to admit she is lazy when it comes to her diet and cooking. She would rather not eat at all than to be committed to the kitchen. This is very interesting to me as she always cooked for her kids growing up. Thankfully I am more than willing to take on the kitchen in all its glory. It has been a very long time since I have been motivated and excited to be in the kitchen, so this challenge has been good for my spirit as well as my body. I'll stop waxing philosophic and get to what you came here for...the food.

I love curry. I love making it myself even more. This gives me the freedom to add the veggies I love the most and leave out all the stuff that I usually pull out (think bamboo shoots). I scoured the internet for the perfect recipe and found elements from different recipes that sounded good, but just not quite what I was looking for in a curry. I'm not afraid of healthy fats. If you are, this might not be the recipe for you. It is full of colorful veggies and lots of flavor. This recipe is not as saucy as a lot of curries I've experienced in my culinary travels. This was by design as I wanted a version that could hold up on its own with or without rice. I went for no rice myself.  Feel free to sub your favorite veggies, but I recommend leaving the sweet potatoes as they add a beautiful creaminess to the texture.


Tofu, Broccoli and Sweet Potato Yellow Curry

4 Servings

1 large sweet potato, peeled and diced into 1/4 inch cubes
3 tablespoons coconut oil, separated (more if needed)
12 oz package of extra firm tofu, drained and pressed, diced into 1/2 inch cubes
1-2 tablespoons non-GMO corn starch or arrowroot powder
1 medium yellow or brown onion, diced
5 cloves minced garlic separated
3 tablespoons hot yellow curry powder (use milder if you aren't a fan of heat)
1 teaspoon cumin
1/2 - 1 t crushed red pepper flakes
1/4 teaspoon salt
1/8 teaspoon cardamom
pinch cayenne pepper
1 can coconut milk (you can use light if you are fat conscious)
1/2 cup rich vegetable broth
2 heads broccoli, cut into bit sized florets
1 large red bell pepper, diced
1/2 cup lightly packed cilantro, chopped (optional)
Sriracha or sambal olek (chili sauce) to taste

Preheat oven to 350. On a parchment lined rimmed baking sheet toss diced sweet potatoes with 1 tablespoon melted coconut oil and a bit of salt and pepper. Bake until softened but not mushy (check at about 15 minutes cook longer if needed). When they are done, remove from oven and set aside.

While the sweet potatoes are baking, pat the cubed tofu dry. Toss in corn starch to lightly coat. In a large skillet melt 1 tablespoon coconut oil over medium heat. Saute the tofu cubes until golden brown (turning half way through to brown evenly). You may have to do this in two  batches and add more oil depending on the size of your pan. Gently transfer tofu to a paper towel lined plate. 

In the same skillet melt 1 tablespoon coconut oil. Add onions and saute until they are softened and slightly translucent. Add 1/2 of the garlic and saute for 1 minute. Add dry spices and saute until fragrant (approximately 30 seconds). Pour in coconut milk and vegetable broth. Reduce heat to a low simmer. 

In another large skillet, saute the broccoli and peppers until they are al dente and bright in color, about 7 minutes. Add remaining garlic and saute for about 1 more minute being careful not to burn the garlic. Remove from heat. 

Add the tofu and the sweet potatoes to the onion/coconut milk mixture and heat through, about 3 minutes. Stir liquid mixture into the broccoli/pepper mixture and stir until combined. Cook slightly longer until all ingredients are heated (maybe another 3 minutes). Stir in cilantro if using. Ladle into 4 bowls on its own or over brown basmati rice. Season to taste with Sriracha (optional).

I hope you enjoy my foray into the world of curry. If you try the recipe, please leave a comment to let me know how it came out and how you liked it. Thanks for reading.

Saturday, July 21, 2018

Instant Pot Smoking Hot Salsa

I got a new toy during Amazon Prime Day the giant Instant Pot! The Arizona summer heat has got me dreading any heat in the kitchen at all. I'm hoping this will motivate me to get back to the kitchen as I love playing with new toys.


To get the party started I was feeling a little spicy and saucy. For years I've cheated and used canned tomatoes to make my salsa. I don't like being a cheater, so I'm excited to be using fresh tomatoes and making my own salsa truly from scratch. This is also a great way to control sodium if you are watching it.

Let's get down to the business of throwing down the recipe.


Instant Pot Smoking Hot Salsa

Makes about 1 quart

6 large tomatoes, cored and diced small (seeds intact)
1 medium sweet yellow onion
2 fresh Serrano chiles, seeds removed, finely diced
2 cloves garlic minced
2 tablespoons apple cider vinegar
1 teaspoon salt
1 teaspoon chipotle powder
1/2 teaspoon cumin
1/2 teaspoon black pepper
1/4 - 1/2 cup cilantro (measured before chopping) chopped

Add all ingredients except for cilantro to Instant Pot inner pot, stir to combine. Set for 30 minutes on manual/steam setting. Let cool to room temperature. Depending on the liquid content of your tomatoes you may want to drain off some of the excess liquid. Stir in chopped cilantro. Refrigerate for at least 4 hours, preferably overnight. The flavor gets better with time.

Sunday, January 7, 2018

Fajita Marinated Grilled Veggies

This past week the local Sprouts had organic bell peppers on sale, so I bought a bunch. I love to eat them straight up with hummus, but not THAT many in a week. I decided to have a little dinner party and thought it would be a beautiful idea to find a way to incorporate my buy into the dinner. I had pineapples to use up and my sis was trying to find a use for some soy curls she wanted to use.

I remembered the Courico Tacos with Grilled Pineapple Salsa from Isa's Vegan Brunch. What a perfect way to use both! So the main course was set. We are all trying to recover from the carb loaded holidays, so I did not want to make rice or chips to go with the whole kitten caboodle. It is 70 degrees in Arizona this week, so I had not qualms about firing up the grill, but these can be made in a grill pan as well. These veggies would be delicious with any latin style dish. Heck, they are good with anything really.


Fajita Marinated Grilled Veggies

Makes 4 Generous Servings

Marinade Ingredients

1/3 cup fresh lime juice
1/4 up avocado oil (or other mild flavored oil)
4 cloves minced garlic
1/2 teaspoon salt
1/2 teaspoon ancho Chile powder
1/4 teaspoon cayenne pepper
1/4 teaspoon black pepper
1/4 teaspoon liquid smoke

2-3 large red, orange or yellow bell peppers, core and veins removed, cut into quarters
2 fresh papilla (poblano) peppers, core and veins removed, cut into quarters
1 large sweet onion, cut into 1/2 inch thick rounds, peeled

Whisk marinade ingredients together in a bowl. Place peppers and marinade in 1 gallon ziplock back (or non-reactive container of your choice). Marinate for at least an hour up to overnight turning/stirring 1/2 way through.

Preheat grill to high. Spray onion slices with thin layer of oil. Place onion slices and peppers on grill. Brush onions with marinade. Grill for approximately 5 minutes per side, making sure peppers are slightly charred and onions have good grill marks before turning. NOTE: Turn onion slices carefully to try to keep intact. Brush second side of onions with marinade.

Serve immediately. Great reheated on sandwiches, in salads on omelets, etc.

Thursday, November 23, 2017

Emergency Golden Gravy - Happy Thanksgiving

This year I am starting some new traditions. I am spending Thanksgiving with some of my friends with whom I have not previously had the pleasure of sharing this day of gratitude. I'm very grateful to be included in the celebration. I suspect we will be tipping back a few. This can often lead to monumental kitchen fails, so I prepped early.

I have been charged with the delicious task of making the mashed potatoes and gravy. I'm going to be making a Yukon gold mash with roasted garlic. I decided I would make dueling gravies. I started off with one of my personal favorites: Cajun Jalapeño Gravy.  I broke a very important rule and didn't taste the jalapeños before adding them. Holy crap!!! They were so freaking hot my hands are still burning a couple of hours later. While I love hot stuff, I modified the recipe to make it a little less "burn your face off hot". The upside is the batch ended up being larger than the original recipe.

Fearing it still may be too hot for some of the milder mannered guests, I set out to make one of my favorite "normal" gravy recipes: Golden Gravy from Yellow Rose Recipes. I'm in a bit of a panic because I cannot find my copy and it is out of print. YIKES! I'm going to be tearing up the house this long weekend to try and find it. In the mean time, I had to come up with an on the fly substitution. Hence the title of this post. I am happy to report this new version turned out great. I think this may be my new favorite non-spicy gravy recipe! I'm excited to share it with you and grateful you are reading my blog as I haven't posted since last year! Enjoy and have a beautiful Thanksgiving. 

Emergency Golden Gravy


Makes Approximately 3 Cups

1 teaspoon rubbed sage
1 teaspoon dried thyme
1 teaspoon granulated garlic (or garlic powder)
1/2 teaspoon fresh cracked black pepper
1/2 teaspoon dried parsley
1/4 teaspoon salt (or more to taste)

5 tablespoons Earth Balance vegan butter
5 tablespoons all purpose flour
1 medium yellow onion, diced small (about 1 cup)
1/4 cup nutritional yeast
2 1/2 cups vegetable broth

Combine dry spices in small bowl and set aside. 

In a saucepan over medium heat, melt butter. Once melted, whisk in flour making sure to scrape sides of pan to incorporate all flour. Cook for about 10 minutes, stirring constantly to prevent burning, until light brown. Stir in onions. Cook for about 5 minutes until softened, stirring frequently to prevent burning. Stir in spices and cook until fragrant, approximately 1 minute. Stir in nutritional yeast until combined. Cook for 1 minute. Whisk in vegetable broth. Simmer until thickened, about 5-10 minutes.  Once thickened, transfer to blender and blend until smooth. Gravy can be served immediately or refrigerated for up to 3 days.

NOTE: If you like a thinner gravy, reduce flour and EB by one tablespoon.

Sunday, May 8, 2016

Marsala Mushroom and Quinoa Soup

I have been eating out so often over the past year. I'm actually quite tired of paying the prices, adding the calories and feeling sluggish. I'm recommitting to my love of cooking and hopefully blogging more often.

While I've been on this eating out tear, I have still been shopping in hopes that I would get by butt back in the kitchen. Fresh foods were rotting in my veggie bins and it was really bugging me that I was being so wasteful.

This particular week I had some beautiful cremini mushrooms teetering on the brink of going bad and I had some leftover cooked quinoa. It's almost the end of cool weather here, so I thought soup should be on the menu. I've always been a fan of Marsala sauces and I happened to have some in my pantry. I looked around to see what else I had in the kitchen so I didn't have to run to the store. I think you'll like the results.


Masala Mushroom and Quinoa Soup

Makes 4 servings

2 tablespoons avocado oil (or other neutral flavored oil), separated
1 medium onion, diced
1 large carrot, small dice
2 tablespoons brown sugar
8 oz. cremini mushrooms, sliced
1 teaspoon dried thyme
1/2 teaspoon black pepper
1/4 teaspoon salt
3 tablespoons marsala wine
3 cups vegetable broth
2 teaspoons Braggs Liquid Aminos (or soy sauce)
1/2 tablespoon lemon juice
1 1/2 cups cooked quinoa
Chopped fresh parsley for garnish.

In a large saucepan over medium-low heat add 1 tablespoon oil, carrots, onions and brown sugar. Saute, stirring occasionally, for 10-12 minutes until onions are caramelized and soft. Add remaining tablespoon of oil and mushrooms. Saute until mushrooms release their liquid. Add thyme, black pepper and salt. Increase heat to medium. Saute until liquid is just about gone, approximate 7 minutes. Deglaze with marsala wine. Saute until liquid is about gone again, about 5 minutes.

Add vegetable broth, Braggs and lemon juice. Bring to a simmer and simmer for 15 minutes. Add cooked quinoa and heat through. Ladle into bowls and sprinkle with parsley before serving.

Sunday, January 17, 2016

Friends in the Kitchen NYE Appetizer - Root Vegetable Cakes with Dirty Rice Rolls and Spicy Sweet Aoili

Every year we do our New Year's Eve dinner, I get super excited to see what will come out of the creative minds and kitchens of my friends.

A little backstory...and certainly my intuition and interpretation. I believe that there are very few coincidences and that we have a lot more history than we are aware of. It seemed an odd coincidence that my friend Jerry and I were introduced by an old high school buddy of mine. After we became friends it became crystal clear that this was no coincidence. When Jerry and I get a chance to talk food and collaborate on an amazing meal I know that we have known each other for a very long time. He get as obsessed as I do with bringing something exciting to the table and I feel I could talk to him for days about gardening, food, cooking and life. 

So every year when we start planning our NYE party, I am like a little kid waiting to see what he is going to create. This year was extra awesome, because I got to help him plate.


Keeping with the cajun/creole theme and his incredible creativity, the appetizer was a festival for the taste buds. I wish I had a recipe, because it was that good. He is iron chef-like and just goes to town creating...which does not include stopping to write things down lest the creative process be hindered.

I do know that the earthy root vegetable cake was created with beets, parsnips, carrots and damn I'm not sure of what finally made it bind. It was truly on the fly. The collards were stuffed with an incredible spicy dirty rice. I could have eaten bowls full of the rice alone. The piquant pepper hit all of the regions of taste buds. It was drizzled with a spicy sweet aioli. The pictures barely do it any justice. His wine pairing of a fruit forward but dry syrah was amazing. 


Tell me this isn't a great way to start the night! 

Thursday, January 14, 2016

New Year's Eve Fabulousness, Festivities and Food!!!

For me, 2015 was the year of work. I spent the year learning, learning and learning more about my new position at work. I love my job, but I let it take over most of my time and energy. The blog, my waistline and my kitchen creativity took the biggest hits. I am happy to say that 2015 was also the year of the kitchen remodel (I will post about that later). Most of the remodel is complete and it is re-igniting my passion for cooking and entertaining (and hopefully blogging).

Last year was the first time in many years we didn't host our 4 course wine tasting dinner and it was sorely missed. I have vowed to do everything in my power to make sure that doesn't happen again! It is always the best way to ring in the New Year: great conversation, great friends and of course amazing food.

This year I originally told everyone to go vegan rogue without a theme. I did mention that I was going to make something cajun/creole, but really had no idea what I was going to make. We lost the Cajun master Paul Prudhomme, so I felt my choice was a very fitting tribute. The table-scape had a Mardi Gras vibe.


I'm going to give you a teaser today and post the menu. My next posts will feature the actual food. Commence drooling!


Thursday, October 22, 2015

Heat Advisory Fajita Bowl


Heat Advisory Fajita Bowl

4 servings as an entree, 6-8 as a side dish

1 can black beans, rinsed and drained
2 cups cooked quinoa, cooled
2 cups tightly packed fresh spinach, stems removed, chopped after measuring
1 tablespoon olive oil
1 medium yellow onion, halved and sliced thinly
2 fresh jalapeno peppers, halved and sliced thinly*
2 teaspoons brown sugar
1 recipe Creamy Chipotle-Lime Dressing (see recipe below)
1/3 cup pepitas
1/2 pint cherry tomatoes, quartered
Avocado and chopped cilantro for garnish (optional)

In a large bowl, stir together black beans and quinoa. Top with spinach but do not stir in.

In a 12 inch iron skillet or non-stick pan over medium heat, heat olive oil. Add onions, jalapeños and brown sugar and saute, stirring occasionally until onions become caramelized, about 10 minutes. Place hot onion mixture on top of spinach to wilt it slightly. While spinach is wilting, make dressing.


Add dressing and pepitas to the bowl and stir well to combine. Gently toss in cherry tomatoes. Serve over more spinach leaves if you like or just as it is in a bowl. You can serve immediately, but I recommend refrigerating for a few hours to let the flavors develop. I prefer this one room temperature. Garnish with avocado and cilantro if you like.

Creamy Chipotle-Lime Dressing

Makes about 1/2 cup

2 tablespoons fresh lime juice
2 tablespoons olive oil
1 tablespoon apple cider vinegar
1/4 cup vegan mayo
2 chipotles in adobo sauce*
1/4 teaspoon Mexican oregano
1/4 teaspoon cumin
1/4 teaspoon granulated garlic
1/4 teaspoon granulated onion
1/4 teaspoon salt
pinch ground coriander

Place all ingredients in small food processor or magic bullet and blend until smooth.

* If you are a little heat sensitive, halve the amount and remove seeds.

Saturday, October 17, 2015

Sugar and Nice and Everything Pumpkin Spice

Fall would not be fall without a barrage of pumpkin themed everything. Last night I was at the home of a dear friend of mine for her 50th birthday party. She and her husband and many of our group of friends wait all year long for the Great Pumpkin season to come. While we don't wait in the pumpkin patch for his ornageness to show up, we do anticipate with glee the arrival of winter squash and the Dali Lama of fall food season: the pumpkin.

During the party, my lovely friend Daph and I got to chatting about restaurants, food and cooking. She shares my great passion for trying new places and recipes. It has been far too long time since my foodie spirit went into hybernation. After our conversation, I felt it begin to awaken from it's deep slumber. That and the fact that by the end of next month, I will have a beautiful newly remodeled kitchen made me want to get cooking and blogging again.

At such party, my honey mentioned not so casually that he thought it would be a great idea for me to make him his favorite Banana-Pecan Pancakes for breakfast in the morning. I knew there were no bananas to be found in the house and after a late night of wine tasting, a trip to the grocery store was not sounding at all appealing. As fate would have it, I had some pumpkin puree in the pantry and these pumpkiny nutty pancakes were born.

I want to share this profound pearl of wisdom from Linus Van Pelt of the Peanuts with you: "There are three things I've learned never to discuss with people: religion, politics and the Great Pumpkin." Linus, thank you for sharing your wisdom, as a token of my gratitude I share this Great Pumpkin inspired recipe.


The Great Pumpkin Spiced Pancakes

Makes 12 pancakes

1 1/2 cups almond milk
1 teaspoon apple cider vinegar
1 Cup All Purpose Flour
1/2 cup white whole wheat flour
1 1/2 teaspoons baking powder
1/2 teaspoon baking soda
1/4 teaspoon salt
1/2 teaspoon ground cinnamon
1/8 teaspoon nutmeg
1/8 teaspoon ground cloves
1 cup pumpkin puree
1/4 cup maple syrup
1 tablespoon melted coconut oil, cooled if heated or 1 tablespoon mild oil such as grapes
1 teaspoon vanilla extract
1/2 cup chopped walnuts, if you prefer toasted walnuts, feel free to toast and cool completely

In a two cup measuring cup (to save yourself an extra dirty bowl) or bowl, combine almond milk and vinegar and set aside to let curdle slightly. In another small bowl combine flours, baking powder, baking soda, salt and spices and make a well in the center.

In a medium sized mixing bowl, whisk together pumpkin puree, maple syrup, oil, vanilla extract and almond milk mixture until well combined and smooth. Pour the liquid mixture into the well in your dry ingredient and whisk with a fork. Be careful not to over mix. It's OK to have a few lumps. Fold in walnuts.

Spray a large iron skillet (or non stick skillet) with coconut oil or other neutral tasting oil. Heat over medium high heat until skillet is hot, being careful not to let it smoke. Using a 1/4 cup measure (I like to use an ice cream scoop). Drop batter onto hot pan and spread slightly using a circular motion to maintain the round shape. Cook on first side until batter starts to bubble and cakes are nicely browned. Top with a pat of Earth Balance and maple syrup. Serve immediately.

These actually freeze well. You can reheat them in the oven for 5-7 minutes at 350.

Sunday, July 26, 2015

Colonel Mustard in the Kitchen with a Giant Portobello

I have to admit, my time in the kitchen over the last year has been pretty minimal. My body and my wallet can attest to the fact that eating out has been the norm. Today I vowed to myself that I would work very hard to cook and eat at home far more often. It really doesn't take that much more time than going out if you make simple stuff, it sure costs less and I like having control over what goes in my belly. Ah kitchen of loveliness, how I have missed you so.

Fred has been a mustard fiend the past several months. He craves it and can't get enough. I thought it would be nice to make something I knew would help him get his mustard on while using up some leftover quinoa I had in the fridge. 

I don't know why, but while I was shopping yesterday, for no reason in particular, I picked up a package of Tofurkey Kielbasa. Food in the shape of links and mustard go together like peanut butter and jelly. Oh and let us not forget the perfect accompianament of caramelized onions. 

Normally I would fire up the grill and pop all of it on a bun. However, I'm trying to cut back on the bread intake, so instead of doing the bun thing, I decided to get a little more creative and use portobellos for the vessel of my creation. It took less than 30 minutes from start to finish, so this would be a great weeknight dinner. The tang and spice of the mustard is a tasty compliment to the meaty kielbasa and portobello. The caramelized onions lend a welcome hint of sweetness. 

Try this one out on your hard core tailgaters and grillers. It is a fun departure from the typical grilled sausages. I'm betting this will be a hit during football season!


Kielbasa and Quinoa Stuffed Portobello Mushrooms with Mustard Sauce

Makes 4 Mushrooms

4 large portobello mushrooms, fins and stems removed (dice stems and set aside)
2 teaspoons tamari
2 teaspoons olive oil
pinch of salt and pepper

2 vegan Kielasa, sliced in 1/4 inch half moons
1 tablespoon olive oil divided
1/2 cup yellow onions, medium dice
1 large clove garlic minced
1/4 teaspoon rubbed sage
1/4 teaspoon black pepper
1/4 teaspoon salt
1/2 vegetable stock
2 tablespoons yellow mustard*
1/4 cup tightly packed fresh parsley, roughly chopped
1 cup cooked quinoa.

Preheat oven to 350 F.

Spray a  9 x 13 baking dish lightly with olive oil. In a small bowl, combine tamari and olive oil. Brush thin coating of mixture on mushrooms. Place mushrooms in baking dish with a small amount of water. Cover with foil and bake for 12 minutes. Remove mushrooms from oven. Let cool enough to handle. Pour out extra liquid. 

While the mushrooms are baking, to a 10 inch non-stick or iron skillet over medium hight heat, add 1/2 tablespoon olive oil and kielbasa. Sauté until nicely browned, turning over one or twice to prevent burning. Set aside on a small plate. 

In the same pan over medium low heat add 1/2 tablespoon oil . Add diced mushrooms and onions and sauté until onions start to caramelize/brown slightly. Add garlic, sage, black pepper and salt. Sauté until fragrant, about 30 seconds. whisk in vegetable stock and mustard until mustard is dissolved. Add parsley and sauté for about 30 more seconds. Stir in browned kielbasa and quinoa and cook until heated through. 

Gently spoon 1/4 of the mixture into each warm portobello cap. Serve immediately or if you like a slight crunch on top, return to the oven uncovered for 5-7 minutes. Garnish with parsley leaf if desired.

It is important to note that the filling is more like a pilaf than a stuffing. 

*The quinoa filling is delicious on its own. If you decide to forgo the mushrooms, reduce the mustard to 1 tablespoon. Feel free to use spicy mustard if you are a spicy food fan. 

Sunday, May 10, 2015

Schnepf Farms Peaches - Peach Walnut Crisp

It seems that most years I somehow miss out on a tradition in our part of the world…the Schnepf Farm Peach Festival. It looks like I may miss out on the actual event again this year because I keep over-booking myself, but I am not missing out on some of the best peaches on the planet. This week I was given a gift of some of these luscious, succulent, sweet beauties.

I am usually kind of on the fence about peaches, but I think I have realized that this is only because I wasn't getting them fresh off of the farm. I bit into one and was amazed at how juicy and flavorful it was. It was hard for me to cook them, because they were so good in their natural nekid form. But cook them and I did. I want to share my creation with you. It's a little twist on tradition with the walnuts, but I think you will agree that this was a delicious call.

I am not always up for making things super labor intensive. Most of the recipes I found for peach cobbler required peeling the peaches. I wanted to skip the peeling for two reasons, I wanted to get this in the oven faster and I just feel the skin has to offer additional fiber and nutritional benefits. While this recipe still has plenty of sugar, I tried not to go crazy on the amount so the peaches natural sweetness would come through. The rolled oats add a nice texture as well. I hope you enjoy this wonderful peach season and give this a try!


Peach Walnut Crisp

6 servings

Filling:

5 large peaches, sliced
2 tablespoons sugar
1/4 cup dark brown sugar
1 1/2 teaspoons arrowroot starch
1 tablespoon lemon juice
1/2 teaspoon vanilla
pinch salt

Crumble:

1/2 cup rolled oats (not quick cooking)
1/2 cup white whole wheat flour
1/2 cup dark brown sugar, lightly packed
1/2 teaspoon cinnamon
pinch salt
5 tablespoons cold Earth Balance vegan margarine (non-hydrogenated), cut into very small cubes

1/3 cup chopped toasted walnuts

Preheat oven to 425 F

Toss the sliced peaches and sugar together in a medium sized bowl. Place peaches in a strainer and let sit for half hour. This will help draw some of the liquid out of the peaches so the crumble isn't goopy. Set the bowl aside.

In a clean medium sized bowl, combine rolled oats, flour, 1/2 cup dark brown sugar, cinnamon and salt. When they are well combined. Add cubed margarine and cut in with your fingers until the mixture until it is evenly mixed and crumbly.

Grab your peach mixing bowl and add peaches and remaining filling ingredients. Gently toss until it is evenly mixed. Spread the peach mixture evenly in the bottom of a 8" X 8" glass baking dish. Top evenly with crumble mixture. Then sprinkle evenly with walnut. Press walnuts into crumble.

Bake for 20-25 minutes until top is golden brown. Let sit for at least 30 minutes before serving.

We ate this plain, but it would be wonderful with some vanilla or cinnamon ice cream.

Sunday, March 15, 2015

How Did I Celebrate Pi Day? "Grand" Strawberry Pie

I kept hearing all the scuttle butt about Pi Day. I am not usually a big pie maker or baker, but I love when I have time to participate in any kind of food themed day. I figured I better get turning the oven on out of my system soon too. It's going to heat up here very quickly and I will not want to go anywhere near that stove when it is above 100 degrees. So Pi day was a tasty excuse to fire it up.


A Four Leaf Clover for St. Patty's Day

I was going to make one of Julie Hasson's no bake pies originally as I had a organic pre-made pie crust in the freezer. Then I found huge containers of fresh organic strawberries at Costco and the stage was set. I am kind of embarrassed to admit, but I have never made a strawberry pie. I decided I wanted to make a double crust baked version, but kept finding recipes for single crust non-baked version. So I kind of mixed ideas to come up with this lovely creation.

The "Grand" comes from the fact that I used fresh orange juice and orange zest from our tree for subtle flavoring. Years ago, I fell in love with the strawberry Grand Marnier flavor combination and thought it would be delicious in pie. Oh yeah, I was right. I brought the pie to a friend's house for dinner and it was demolished. Not a scrap left. I think this pie would be lovely with a nice Prosecco or sparkling water with a squeeze of lemon if you are not a drinker.


"Grand" Strawberry Pie

Make One 9-inch pie

2 pounds fresh strawberries, quartered if large, halved if small (about 6 cups)
1/2 cup orange juice
1/2 cup sugar
3 tablespoons arrowroot starch
1 teaspoon orange zest
1/2 teaspoon vanilla

2 raw pie crust rounds (your favorite recipe, my favorite to use is the Basic Pastry Crust from Veganomicon).

Spray coconut oil (or any other neutrally flavored oil)
Sugar for sprinkling on the top crust

Preheat oven to 400 degrees. Lightly spray 9 inch pie pan with oil.

Place 5 cups fresh strawberries in a large bowl, reserving 1 cup.

In a blender, combine 1 cup strawberries, orange juice, sugar, arrowroot, zest and vanilla until smooth. Place in a small saucepan over medium-low heat. Simmer until thickened, stirring constantly, about 3 minutes. Pour thickened mixture over fresh strawberries and stir until they are evenly coated.

Roll out one pie crust (don't forget to use flour and parchment paper to make rolling a breeze) to about 1 inch larger than the pie pan. Gently press to the bottom of pie pan. Fold edges under and pinch gently to shape edges. Spoon in Strawberry mixture. Roll out second pie crust. Using cookie cutter of your choice, cut out fun shapes and place evenly over the top of the pie. You want to cover at least 2/3 of the pie surface. As an alternative, you can make lattice. I am too impatient for that, so I cheat. Spray top pie dough with a light coating of oil. Sprinkle with a touch of additional sugar. Place in the oven and bake for 35-40 minutes until the crust is slightly browned.

Remove from oven. Let cool slightly, then refrigerate for at least three hours until completely cool before serving.

Watch it disappear!

Tuesday, March 3, 2015

Vegan Tacos - The Interview with Jason Wyrick


Jason Wyrick was kind enough to grant me this interview months ago when he and his lovely bride were expecting their first bundle of love. I wasn't able to post it during vegan MoFo then time and motivation to blog got away from me. The book is a true treasure of information on Mexican food and more importantly Tacos. Tacos for every meal and for every taste. Tacos for breakfast, hell to the yes! Tantalizing side dishes, you know it. Oh and margaritas, si! Not to mention Jason provides tequniques and tips to make you cook like abuela (Mexican for Grandma).

Not that the interview isn't awesome enough; but to make the deal sweeter, I'm going to be giving away a copy of Vegan Tacos to one lucky amigo or amiga as the case may be. Read on, the giveaway is at the bottom of the post. Enjoy the interview and a few pictures of the mouth watering tacos I made from the book!


Tacos with Chorizo and Fresh Shiitakes in a Chipotle Tomato Stew(pg. 102)
With Wilted Chard (subbed kale) with Mojo de Ajo (pg. 199)
Crushed Red Salsa (pg. 212)


Your heath tranformation story is quite amazing. What finally made you take charge of your health and why vegan?
I'll be blunt. I used to be fat and diabetic. It was a pretty traumatizing experience. I had all the symptoms of diabetes. Joint pain, failing eyesight, spikes and crashes, having to sleep for way too long, cloudy thinking, neuropathy, and chronic infections, all by the time I was in my mid-twenties. A pretty drastic change from being a high-school athlete. The thing is, obesity and diabetes feed on themselves, so both got worse quickly. I eventually had a life-threatening infection and after being treated for it, I was told I had to take medication for the rest of my life. I thought first, I never want to go through that particularly painful treatment again, and second, it's ridiculous that I was being told to take meds and I wasn't even thirty. So I did the best thing that I could. I switched my diet after discovering Dr. John McDougall's work.
Did you go vegan cold turkey or was it a gradual shift?
I was vegan, except on Wednesdays, when I would go to my favorite restaurant and get all-you-can-eat enchiladas. After a while, I would go every other week, then once a month, and finally, I realized the enchiladas didn't taste good anymore and I felt horrible after eating them. I also learned about factory farming during that time. One day, I simply stopped eating them and then I was fully vegan.
You kicked diabetes single handedly. With so many Americans being diagnosed with diabetes and other degenerative diseases, what suggestions do you have for those who want to live a healthier lifestyle?
Make as many changes as you can, but don't make so many that you end up feeling a high level of stress about a lifestyle change. The more changes you make, the more you will want to make. Give yourself some time and don't let anyone tell you to go from 0 to 60 and make you feel bad when you can't.
If you could cook for and dine with anyone in history, who would it be and why? What would you make for them?
Heh, I have an interesting answer for that. I'd dine with Socrates and make him a meal with chiles and coffee. Maybe a chilaquile with coffee chile sauce. Coffee and chiles act as stimulants and therefor antidotes for hemlock. Once I mitigated the hemlock poison, with a fine meal I might add, I'd try to smuggle him out of Athens. A vegan meal to save one of the great philosophers of ancient Greece! Ok, it might be best not to ask me questions like this, lol.
Jason, you and I met several years ago. At the time you were the only vegan caterer in the Phoenix area. You catered both my bachelorette party and my wedding. Not only was your food incredible, but as my non-vegan friends ate it, they thought it was delicious. Have you seen a change in the vegan food scene here in Arizona? Do you have some suggestions for Phoenicians looking for good vegan friendly restaurants?
There are a few more restaurants, and a couple less. A few of the more popular ones here have problems, but I always recommend Fresh Mint to people. It's on Scottsdale and Thunderbird Road. 
I often get the question "What do we feed you people?" from friends and family. How do you handle social events as "The Vegan"?
I just make food with bold flavors and hearty textures if I am cooking for others. When serving non-vegans, you need something that cuts through all the rich foods they are used to eating. It's as simple as that.
Tell us about your new book Vegan Tacos.
This book isn't just a book about vegan tacos, it happens to be one of the most comprehensive book of authentic Mexican tacos published in English, regardless of being vegan. I love real Mexican food. It's complex, bright, bold, spicy, and soulful. A true taco encapsulates all of those aspects into a handheld bite. I went to Mexico to find as many authentic tacos as I could to bring back to the vegan community, and I found an entire book's worth of them! You'll learn about the different styles of tacos, plus Vegan Tacos has entire sections dedicated to salsas, how to make your own tortillas, and various toppings for all the taco recipes in the book.
It's also filled with historical and anthropological information because I think the story of food is fascinating. To me, it's not just what is on the plate. 

Enchilada-Style Tacos (pg.118)

You have been writing, creating and teaching for a long time. What did you find most challenging about writing a book compared to you digital publications?
Print photography is a lot more exacting than photography for digital publications. The other challenge is that once it's printed, it's set in stone. With digital publications, you can update them as needed. There are also space limitations with a physical book, although kudos to my publisher, because the book was slated to be much smaller than it ended up being, but once Vegan Heritage Press saw all the material, they upped the page count instead of cutting the content. Overall, I think digital products are more versatile and pack more information if done well, but they're not considered as legitimate as having the information printed on a page. Hence, why I switched to writing books.
I'm a lover of southwestern fare as you can probably tell by many of my blog posts. What recommendations can you make to those who do not live in the Southwest as far as finding the chiles and spices that give life and bold flavor to your recipes?
If it's a dry chile, order them from Amazon! They're not expensive and you can get big bags of dried chiles shipped right to your door. For fresh chiles, you should at least be able to find jalapenos so you can get some heat in your tacos. I travel around the country a lot teaching vegan cooking classes and it is rare that I find a place where I can't find decent Mexican ingredients.
What is your favorite recipe from Vegan Tacos?
Right now, it's the Grilled Lime Margarita with Mesquite Smoked Salt. Did I mention that there is an entire section on drinks in Vegan Tacos? Now I want to make another margarita...
What's next? Do you have another book in the works?
I do have a few more books in the works, although I can't talk about them yet. I'll be traveling around to various vegfests doing taco demos and showcasing amazing vegan Mexican food to people everywhere! I can't wait.

Thanks for the great interview Jason!

And now…the winner is…#9. Elizabeth! Congratulations. Get ready to have a delicious fiesta!


Now for what you have been drooling over! I will be giving away a copy of Vegan Tacos to one of you loyal readers. Leave a post about what you dream about having in a taco or your favorite Mexican food or spice by this Friday, March 6th by midnight MST. The winner will be drawn at random on Saturday the 7th. US only please. Muy Bueno! Good Luck! *****PLEASE MAKE SURE TO LEAVE ME A WAY TO CONTACT YOU, THANKS****


Saturday, January 31, 2015

My Answer to the NFL Invasion of Phoenix - Buffalo Cauliflower - Just in Time for the Big Game

My fellow Phoenicians, if you are like me, you want to stay away from all of the craziness of the NFL fan craziness and traffic in our fair valley. I'm going to be staying close to home and making my own game day tailgating style fabulousness. If you are staying home or going to a house party for the big game, here is a twist on wings that will be sure to disappear quickly.

I've been seeing quite a few pictures of Buffalo Cauliflower floating around in cyberspace. I tried one recipe that was baked and although it was probably a fairly healthy alternative, the texture just wasn't working for me. So I decided that mine need to be fried! Yes, some days I just throw caution to the wind and fire up that pot of hot oil. I love the crunch of deep fried yumminess. You will love these crisply cruciferous nuggets of glorious Louisiana heat. You will get some fiber and antioxidants along with a little fire for the taste buds. They can be made gluten free by substituting gluten free flour. These are the perfect snack for the football or puppy bowl game.


Louisiana Heat Cauliflower Wingz

4 Servings (can double)

1/2 cup Louisianna Hot Sauce (or your favorite hot sauce)
2 tablespoons olive oil
2 teaspoons crushed red pepper (optional for suicide wings)

1/4 cup flour (can use rice flour for GF option)
1/4 cup non-GMO corn starch
1 tablespoon nutritional yeast
1 teaspoon granulated garlic (or garlic powder)
1/2 teaspoon granulated onion (or onion powder)
1/2 teaspoon smoked paprika
1/2 teaspoon salt
1/2 cup water

1 medium head organic cauliflower, cut into approximately 1/2 - 3/4 inch florets (not too big)

Oil for frying (must be at least 1/2 inch deep in pan). Heated in an iron skillet or heavy bottomed skillet to 350.

Whisk hot sauce and olive oil in large bowl (and crushed red pepper if using). Set aside.

Whisk flour, corn starch, nutritional yeast, granulated garlic, granulated onion, smoked paprika, salt together until batter is smooth. Dip cauliflower into batter, making sure to gently tap off extra batter. Note: You don't want the batter to be too think or the nuggets may not have that crispy awesomeness. Carefully place battered cauliflower into hot oil. Fry until golden brown, approximately 3 minutes. Remove with a slotted spoon draining as much of the oil as possible. Add to bowl with sauce mixture. Toss to coat. Serve with your favorite ranch dressing and carrot and celery sticks.

Tuesday, September 30, 2014

2014 Vegan MOFO - Day 30 - Thank You Chow Locally!


Well, it's the conclusion of yet another MOFO. I did not gain MOFO rock star status by posting every day while I'm crazy busy. But, we did share a month of local awesomeness and much produce was eaten and given away. I'm already thinking about next year when life will be less hectic and I can truly put all of my creative energy into blogging. So many cool themes. Hoping to start doing some video for next year. So make sure to pop in…maybe even like the page so you can get notification when something new gets posted.

I want to thank Eric at Chow Locally for providing FOUR share boxes to the lucky winners. I hope you all enjoyed the produce and hopefully signed up to get a weekly box. Give yourself a big local hug for supporting sustainable and local farmers. They need  you!

As both MOFO and summer wind down, I leave you for now with a refreshing summer drink created with love and local watermelon from a previous Chow Locally box. Be well and eat your fruits and veggies.


Watermelon-tini

Makes one Drink poo

1 oz. premium vodka
1/3 cup diced seeded watermelon
1/4 cup sparkling mineral water

Add vodka and watermelon to blender. Blend until smooth. Pour mixture into chilled martini glass. Add sparkling mineral water and gently stir. Garnish rim with small, thin wedge of watermelon. Drink!

Monday, September 29, 2014

2014 Vegan MOFO - Day 29 - Asian Pear Salad with Miso Ginger Dressing

Today's recipes features three things from this past week's Chow Locally share box:


I'itoi Onions from Maya's Farm - I'itoi onions have a ing history in Arizona having been traditionally grown by Native Americans such as the Tohono O'odham for centuries. Store in the crisper drawer. My note: we have had great luck growing this variety in our garden. The onions from last year gave us a whole new crop this year.

Mixed Bell Peppers from Crooked Sky Farms - Bell pepper are a great way to add crunch to salads and stir fries, or simply to slice up and add to lunches as a snack.

Yalo Pears from Sleeping Frog Farm - Yali (Asian) pears can be stored on the countertop or in the fridge. They are slightly crispier than regular pears, so they make for a delicious crunchy snack! My note: The texture vaguely reminded me of jicama.

I got some gorgeous kale at the farmers market and had some nice radicchio left over from a previous dish. I added some almonds for extra calcium and protein and voila, a full meal salad! The dressing I used was a variation from this post. I added a little tahini to make it creamier and boost the nutrients a bit. I love how the hint of sweetness of the pear contrasts the slight bitterness of the radicchio in this salad.


Asian Pear Salad with Miso Ginger Dressing

Makes 2 Entree Salad or 4 side salads

1 small bunch kale (about 4 cups), torn into bite sized pieces
1 recipe Miso Ginger Dressing (recipe below), separated
1 small head radicchio (about 1 cup, can sub regular red cabbage)
2 Asian pears, halved, cored and thinly sliced
1 bell pepper (any color but green), diced small
2 I'itoi or green onions, thinly sliced
1/4 - 1/2 cup raw almonds (I like more than less)
1 medium avocado, diced

In a large bowl, massage kale with 1/4 cup Miso Ginger Dressing. Toss in radicchio, pears, bell pepper almonds and green onions. Taste and add more dressing and salt and pepper to taste. Gently toss in diced avocado. Serve immediately.

Miso Ginger Dressing

Makes approximately 1/2 cup

1 tablespoon red miso
2 tablespoons brown rice vinegar
2 tablespoons toasted sesame oil
1 tablespoon tahini
1 tablespoon low sodium tamari or soy sauce
1 tablespoon fresh lemon juice
1 teaspoon fresh ginger, grated

Add all ingredients to blender. Blend until smooth. Can store in an airtight container in the fridge for up to a week.

Sunday, September 28, 2014

2014 Vegan Mofo - Day 28 - Costco Vegan Pierogi and Pear Sauce

As time has been tight as of late, my eating habits have been iffy at best. I was cruising through Costco to get some Dave's Killer Bread and Pellegrino Water. There was one of those vendor road shows where they pass out samples. Well it was my lucky day! They were sampling 4 different kind of Pierogi - 2 vegan!!! I decided to buy a giant bag of the potato and onion variety. Some people I know eat them with apple sauce. I did a little play on that idea (and a much easier one). A couple of weeks ago my Chow Locally Box had Bartlett pears in it. They were not yet ripe, so I had to wait before I could eat and use them.

I took 3 small very ripe bartlett pears, peeled and roughly chopped them (about 1 1/2 cups before pureeing). Tossed those in the bullet container with about 1/8 teaspoon of cardamom and pureed it all in my Magic Bullet until is was the consistency of apple sauce. NOTE: If the pears are not soft, you may have to add a little water.

The pierogi were really good! I was surprised. I'm glad I bought the giant bag. There were plenty of onions in them and the dough was yummy. I sautéed the pierogi in a healthy amount of olive oil until they were gorgeously browned. Dip and love! The sauce will keep in the fridge for a day or two.